Mausoleum
Experiments
In brief
You can use Mausoleum also to store experimental results for your mice. Of course you can also storeĀ such information in the comment field of mice. But that leads to an accumulation of unreadable and unstructured data which can hardly be found later. To avoid such an accumulation of unstrucured result data Mausoleum provides the Experiment objects which lets you define the expereiments which are carried on in your lab. In addition for each experiment you specify the type of results you expect. These types are available:
- Yes/No: This type of experiment might be used for simple yes/no observations. Some people like to use this type of experiment to store a special treatment of the mice.
- Integer number: Integer numbers are expected for experiments where something is counted or a attribute of a treatment is stored.
- Floating point number: Here you can enter arbitrary numbers. A simple example for such an experiment is weihing of mice.
- Choice: In such experiments the user can select from a given set of possible results. An example could be the fur color.
- Free: For experiments defined as "Free" anything can be typed in as a result. This of course gives a maximum of freedeom but makes it really difficult to handle the results later on. You should restrict this type to experiments where really noen of the other types is applicable.
- Image: This type wil ask for images as a result.
- Location: A very special type of experiment. Possible result are GPS-coordinates. It was introduced to store the information where wild living animals were catched. Most labs won't use this type.
After you have defined experiments you can enter experimental results for your mice in a structured and searchable manner which makes further evaluation of your results easy. How to store and retrieve experimental results is descriibed here.
The Experiment table
By clicking "Experiments" in the object selection field of the Inspector you will get a window with the table of all actually defined experiments of the group.
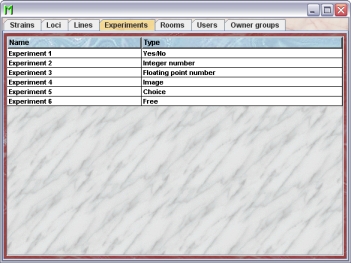
Using the command "Arrange columns" from the context menu (right mouse click in the table) you can specify which attributes of the experiments should be shown in this table. These attributes are available for the experiment table:
| Column header | Description | Sortable | Filterable | Colorable |
| Foreign key | Foreign ID from other system | ✓ | ||
| Group | Group name | ✓ | ✓ | |
| ID | The technical ID | ✓ | ||
| Name | Name of the experiment | ✓ | ||
| Type | Type of the experiment | ✓ | ✓ | |
| end | The end date of the object | ✓ | ||
| start | The start date of the object | ✓ |
The Experiment inspector
The experiment inspector is active as soon as the experiment table becomes the active table. It will adopt to the attributes of the selected experiment and lets the user modify the attributes if the user has sufficient privileges to do so. The experiment inspector has three tabs
The "Attributes" tab
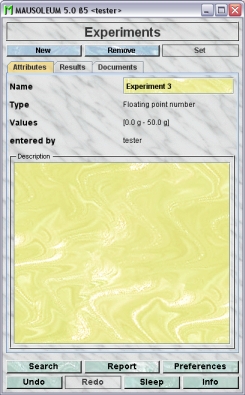
It shows the attributes of the experiment:
- Name:The name of the experiment. It can be changed by the GURU of the group
- Type: The type (number, text or image etc.) of the results to expect from this experiment. This attribute cannot be changed
- Values: The possible range of result values of the results to expect from this experiment if applicable. This attribute cannot be changed.
- entered by: The name of the user who entered the selected experiment. This attribute cannot be changed
- Description: In this field the GURU can type in a more thorough description of the selected cohort. Remember that you have to use the "Set"-button to transmit the changes in this field to the database. It is not possible to edit the comments if more than one object is selected.
The "Results" tab
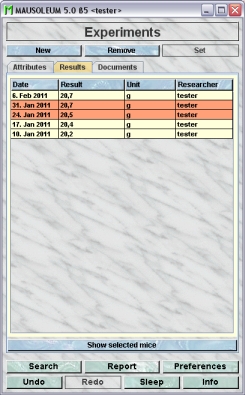
It shows the results for the selected Experiment which are set in the set of active mice. Using the command "Arrange columns" from the context menu (right mouse click in the table) you can specify which attributes of the results should be shown in this table. These attributes are available for the result table:
| Column header | Description | Sortable | Filterable | Colorable |
| Date | Date of the result | ✓ | ||
| ET | Eartag | ✓ | ||
| Experiment | Name of the experiment | ✓ | ✓ | |
| Foreign key | Foreign ID from other system | ✓ | ||
| Group | Group name | ✓ | ✓ | |
| ID | The technical ID | ✓ | ||
| Researcher | The name of the person who performed the experiment | ✓ | ✓ | |
| Result | The result | ✓ | ||
| Unit | The unit | ✓ | ||
| end | The end date of the object | ✓ | ||
| mouse ID | The system ID of the mouse | ✓ | ||
| start | The start date of the object | ✓ |
In this table you see the results for the selected experiments. You don't see the individual mice for which these results were set. To generated a mouse table where you can see the associated mice you click the button "Show selected mice" and a window with a table containing the mice will open:

The "Documents" tab
This tab lets you store and exchange documents like pdf- or Word-files with additional informations about the experiments of your group. In this tab you will find a list with the document which have been uploaded to the server.
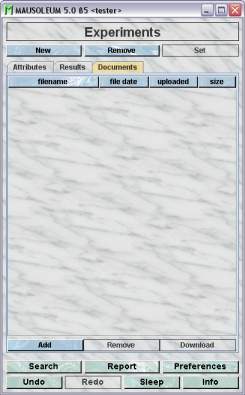
GURUs can add new documents for the selected objects by clicking the "Add"-button beneath the documents list. You will be asked for the location of the document and after congfiming this dialog the file is uploaded top the server and will be displayed in the list. GURUs can also remove documents by selecting one of the documents in the list and clicking the "Remove"-button beneath the documents list. You can download a document and store it on your client computer by clicking the "Download"-button.
Adding experiments
Only GURUs can add and remove experiments. To add a new mouse strain you click "Experiments" in the object selection field of the inspector. The table of experiments opens. In the Experiment-inspector you click the "New"-button. A dialog appears in which you can specify the attributes of the new experiment.

First you will specify the name for the experiment. Then you have to specify the type of results you expect from the new experiment. You select it from the selection field below the name field.

These types are available:
- Yes/No: This type of experiment might be used for simple yes/no observations. Some people like to use this type of experiment to store a special treatment of the mice.
- Integer number: Integer numbers are expected for experiments where something is counted or a attribute of a treatment is stored.
- Floating point number: Here you can enter arbitrary numbers. A simple example for such an experiment is weihing of mice.
- Choice: In such experiments the user can select from a given set of possible results. An example could be the fur color.
- Free: For experiments defined as "Free" anything can be typed in as a result. This of course gives a maximum of freedeom but makes it really difficult to handle the results later on. You should restrict this type to experiments where really noen of the other types is applicable.
- Image: This type wil ask for images as a result.
- Location: A very special type of experiment. Possible result are GPS-coordinates. It was introduced to store the information where wild living animals were catched. Most labs won't use this type.
Depending on the type you selected the dialog will ask you to specify additional informations.
Dialog for a new "Yes/No" experiment
For the "Yes/No" experiments no additional information is needed
Dialog for a new "Integer number" experiment
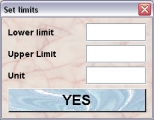
For the "Integer number" experiments you have to specify lower and upper limit of the expected results.
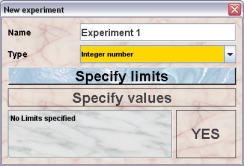
You click on the "Specify limits"-button and a dialog opens where you can set lower and upper limit of the expected results for the new experiment. You can also specify a unit for the values.
Dialog for a new "Floating point number" experiment
For the "Floating point number" experiments you have to specify lower and upper limit of the expected results.
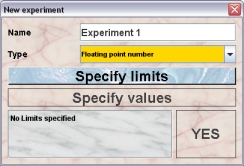
You click on the "Specify limits"-button and a dialog opens where you can set lower and upper limit of the expected results for the new experiment. You can also specify a unit for the values.
Dialog for a new "Choice" experiment
For the "Choice" experiments the set of potential results is needed.

You click on the "Specify values"-button and a dialog opens where you can type in the potential results of this experiment. Each line in this text area will specify one potential result.

Dialog for a new "Free" experiment
For the "Free" experiments no additional information is needed because the user will type in any text describing the result when entering a result later on.

Dialog for a new "Image" experiment
For the "Image" experiments no additional information is needed.

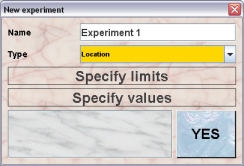
Dialog for a new "Location" experiment
For the "Location" experiments no additional information is needed.
Ā