Mausoleum
Mice
In brief
Mice are of course the most interesting and important objects handled by Mausoleum. Indeed all objects in the database are ed - directly or indirectly - to the mice in your database. The following drawing depicts the most important connections between the different objects and their relation to the mice in mausoleum:

How to manage these connections and the inner indepent attributes of the mice is the main focus of this chapter. A detailed description of the attributes of a mouse, how they are visualized and how to set or change them can be found here.
The mouse table
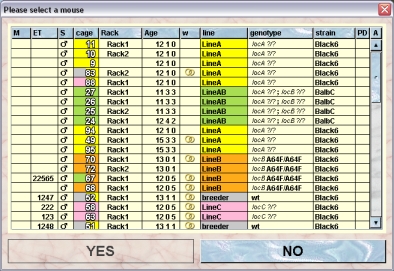
After clicking "Mice" in the object selection area of the inspector you will get the mouse window.
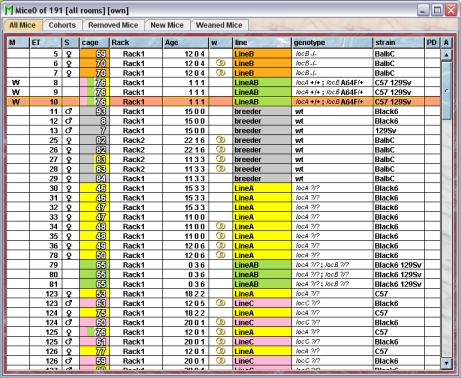
This window contains different tabs with specialized mouse tables:
- All mice: This table holds the table with all the active mice of the group.
- Cohorts: This table shows the actual mouse cohorts defined in this group.
- Removed mice: In this table you find all mice wihich were killed or exported during your session.
- New mice: Here you find all mice which wer entered into the database nomatter whether they were introduced by littering, importing from another group or created.
- Weaned mice: This table contains all mice which were weaned during your session.
Using the command "Arrange columns" from the context menu (right mouse click in the table) you can specify which attributes of the mice should be shown in a mouse table. These attributes are available for a mouse table:
| Column header | Description | Sortable | Filterable | Colorable |
| Age | The age of the mouse | ✓ | ✓ | |
| All owners | All owners or owner groups of the mouse | ✓ | ✓ | |
| Barcode | The Barcode for this mouse | ✓ | ||
| Cohorts | The cohorts to which the mouse belongs | ✓ | ✓ | |
| ET | Eartag | ✓ | ✓ | |
| End mode | The mode by which the mouse was removed from the actual mice | ✓ | ✓ | |
| Foreign key | Foreign ID from other system | ✓ | ||
| Generation (P/F) | Shows generation marker in P, F1, F2� style | ✓ | ✓ | |
| Group | Group name | ✓ | ✓ | |
| ID | The technical ID |
X |
||
| License | The license for this mouse | ✓ | ✓ | ✓ |
| M | Mark | ✓ | ✓ | |
| Maturity limit | The maturity limit. I. e. the time in days for the mouse to become sexually active. | ✓ | ✓ | |
| Owner | Name of the primary user | ✓ | ✓ | ✓ |
| PD | The Plug-date | ✓ | ||
| Rack | The rack in which the mouse is located | ✓ | ✓ | ✓ |
| S | The Sex of the mouse | ✓ | ✓ | ✓ |
| Start mode | The mode by which the mouse was introduced tnto the database | ✓ | ✓ | |
| birthday | The birthday of the mouse | ✓ | ✓ | |
| cage | The cage in which the mouse is located | ✓ | ✓ | ✓ |
| end | The end date of the object | ✓ | ||
| genotype | The genotype of the mouse | ✓ | ✓ | |
| kids | The number of kids from the mouse | ✓ | ||
| line | The Line of the mouse | ✓ | ✓ | ✓ |
| start | The start date of the object | ✓ | ||
| strain | The strain of the mouse | ✓ | ✓ | ✓ |
| tag | Alphanumeric Tag | ✓ | ||
| w | Indicator for matings | ✓ | ✓ | ✓ |
In the mouse tables you can specify whether you want to see all objects of the group or only the objects you own. To switch between these display modes you use the little "A" button in top right corner of the table:

If this button is active (pressed) you will see all objects of the group. Your own objects are shown in black whereas objects owned by other users are shown with a blue font color.
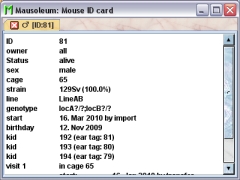
Double clicking a mouse in a mouse table will bring up the ID card which contains more specific informations about the mouse.
More informations can be retreived by the fact sheets which can be obtained via the context menu (right mouse click) of a mouse table.
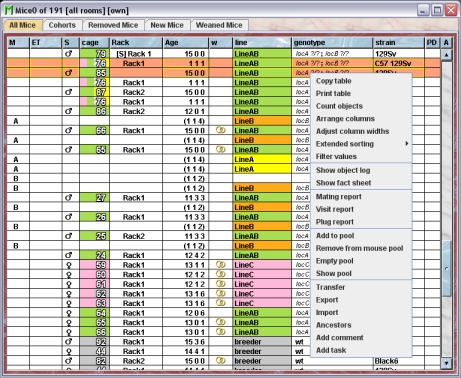
In this example of a mouse contex menu you see more items compared to other tables. The items available in all tables are explained in detail in this chapter. In a mouse tables you have three items giving you special parts of the fact sheets:
- Mating report: Shows all productive matings during the lifetime of the mouse. The litters are shown with statistical information. In addition the calculated mating efficiency for all matings is shown.
- Visit report: Shows all cage vistis of the mouse with entry date and end date if applicable. Also the cage mates during the time in the respective cage are listed.
- Plug report: The plug report is defined for male mice. Males do not get plug dates, but the performance of a male can be viewed.In the report all mating opportunities with dates for successful plugging are shown.
The next four items of the context menu are functions for handling the Mausoleum pool of cages and mice described here. The items are:
- Add to pool:Adds the select mice to the Mausoleum pool.
- Remove from mouse pool: Removes the selected mice from the Mausoleum pool if possible.
- Empty pool:This wil empty the pool removing all mice and cages you put in.
- Show pool:Selecting this item will bring up the window with the pool snapshots as described above.
Below these items you find the items which correspond to the action buttons which are active at the moment. The activity of the buttons and the presence of items in the context menu is determined by the selected mices.
Mouse inspector
The mouse inspector is active as soon as a mouse table becomes the active table. It will adopt to the attributes of the selected mouse and lets the user modify the attributes if the user has sufficient privileges to do so. The mouse inspector has five tabs:
The "Attributes" tab
It shows the attributes of the selected mouse:
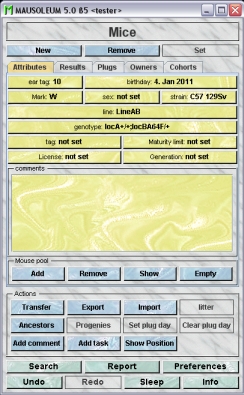
This tab with all the attributes of the selected mice will always appear independent of which columns are being shown in the mouse table. The yellow buttons will change information for all selected mice, except that the comment box will work only for single mice. See below for adding comments to several mice simultaneously. The behaviour of the buttons depends on the setting for "Set mode" in the Preferences. If set to "immediate" the change is (for most of the attributes) immediately written to the database. If set to "Delayed" the changes are collected and only transmitted to the databse, when the "Set"-button is pressed. If you are using Mausoleum in this mode it is important to click the "SET" button if any of the yellow datafields turns red before leaving the tab or selecting other mice. Otherwise the data entered will be lost. Clicking "YES" in dialogs has the same function as the "SET" button.
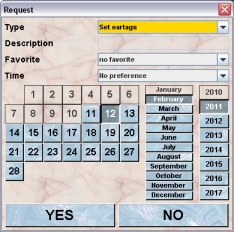
This button shows the eartag of the selected mice. The eartag is a numeric tag and corresponds to physical tags of the mouse. The eartag is supposed to be unique within the living mice. Therefore a defined eartag can only be shown if one mouse is selected. If the ertag is not specifed this button shows the label "not set". If more mice are selected and at least one of them has a defined eartag it shows "multiple". The eartag shown here might differ from what you see in mouse tables and cage cards. This is the case when you defined an eartag prefix in the line of the mice.
You set this value by clicking this button or by clicking in the corresponding cell of a mouse table (if "Edit in in tables" is set in the Preferences) using this dialog:
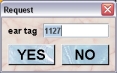
The default value is the last set eartag +1 (assuming that you are using a set of clips or tags with consecutive numbers). You can specify whether or not the last set eartag should be kept in the database for the next session in the Preferences. If more than one mouse is selected the eartags are given to the selected mice as consecutive numbers.
Eartags are by default unique for the set of living mice of a group, but duplications are allowed after a grumble from the mouse pope. You will get also an alert if wou want to set eartags for mice for which the eartag is already defined:

birthday:
This button shows the birthday of the selected mice. If the birthday is not specifed for any of the selected mice this button shows the label "not set". If more mice are selected and no common birthday can be determined it shows "multiple". The date format can be chosen in the Preferences.
The birthday of mouse is defined automatically when the mouse was introduced in to database by littering If the mouse was created without a litter the birthday has to be specified manually. The brithday of a mouse can be set by clicking this button or by clicking in the "Age" cell of a mouse table (if "Edit in in tables" is set in the Preferences) using this calendar dialog:

The birthday of a mouse is essential for the determination of the sexual activity which is necessary to detect matings in the system. It is therfore crucial that correct birthdays are set for your mice.
mark:
Mice can be tagged with a mark. This can be either the standard pointer or a letter from A to Z. This mark helps to quickly identify mice in mice tables. This button shows the mark of the selected mice. If no mark is set for any of the selected mice this button shows the label "not set". If more mice are selected and no common mark can be determined it shows "multiple". You set this value by clicking this button or by clicking in the "M" cell of a mouse table (if "Edit in in tables" is set in the Preferences) using this dialog:

sex:
This button shows the sex of the selected mice. If the sex is undefined for any the selected mice this button shows the label "not set". If more mice are selected and no common sex can be determined it shows "multiple". You set this value by clicking this button or by clicking in the "S" cell of a mouse table (if "Edit in in tables" is set in the Preferences) using this dialog:

If the sex is already defined for at least one of the select mice and you are going to change it you will get this mouse pope alert:

strain:
This button shows the strains of the selected mice. The strain defines the genetic background of the mice. A mouse can be have more than one strain if it is e. g. an anaimal from a backcross experiment. While producing a litter Mausoleum calculated the strain composition of the offspring. So, if the parents of a mouse have different strains the mosue will have a strain composition which reflects the mixture of the parents' strains.
If the strain is undefined for all selected mice this button shows the label "not set". If more mice are selected and no common strain can be determined it shows "multiple". You set this value by clicking this button or by clicking in the "strain" cell of a mouse table (if "Edit in in tables" is set in the Preferences) using this dialog:
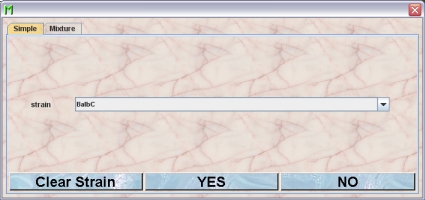
This dialog has two tabs. The tab "Simple" offers the possibility to select a strain from the set of avtive and visible strains. If you select a strain and confirm your selection by clicking "YES" the selected strain is set to 100% for all selected mice. You can also clear the strain information for the selected mice by clicking "Clear strain". If you want to specify a strain mixture for the selected mice you switch to the tab "Mixture":
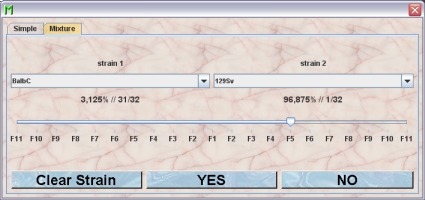
Here you can define the strain of the selected mice to be a mixture of two strains. This is useful when you are dealing with mice from a backcrossing experiment. In the two selection fields ("strain 1" and "strain 2") you select the strains and in the slider below these fields you set the ratio of mixture. The ticks of the slider are labeled with the generation markers in a backcross experiment. "F1" gives a 50/50 mixture "F2" a 75/25 mixture and so on.
If you want to change a defined strain of a mouse you will get this mouse pope alert:
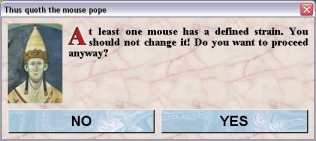
You can ignore this warning by clicking "YES".
line:
This button shows the defined line of the selected mice. Each mouse can have one only one defined line. While producing a litter Mausoleumdetermines the line of the offsprring. If the parents belong to different lines the line is determined by checking all active lines if there is a line which contains all alleles of all loci of the lines from the parents. If there is such a line this will be the line of the pups. If no such line can be found it depends on the role of the user what is happening. If it is a GURU a line mixture can be produced. If the user doesn't have enough privileges to define new lines the line of the pups remains undefined.
If the line is undefined for all selected mice this button shows the label "not set". If more mice are selected and no common line can be determined it shows "multiple". You set this value by clicking this button or by clicking in the "line" cell of a mouse table (if "Edit in in tables" is set in the Preferences) using this dialog:
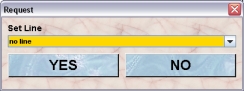
You can also delete the line information for the selected mice by selecting "no line" in the selection field of the dialog. If you do so of course the genotype is also removed. If you want to change a defined line of a mouse you will get this mouse pope alert:
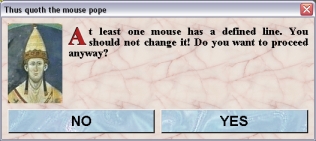
You can ignore this warning by clicking "YES".
genotype:
The genotype can be defined from the alleles of the loci which are defined in the line of the mose. Therefore before defining the genotype of a mouse first the line has to be defined. This button shows the genotype of the selected mice. This button is inactive if the selected mice have no defined line or have different lines. It is also inactive if the line of the selected mice is the "breeder" line which has by definition only the wild-.type geontype "wt". Another situation in which this button is inactive is when you selected mice of different or undefined sex and the line contains a locus which is non autosomal. If the selected mice have a common line but different genotypes it has the label "multiple". You set this value by clicking this button or by clicking in the "genotype" cell of a mouse table (if "Edit in in tables" is set in the Preferences) using this dialog:
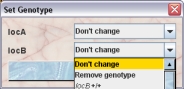
In this dialog you can set the genotype for each locus of the line independently. Fir all loci you get a selection field where you can chosse from all combinations of the alleles which are contained in the line for the given locus. For the loci where you don't want to change the genotype information you select "Don't change" in the selection field.
tag:
Th eartag attribute discussed above is intended for id marking mice with metallic tags and is purely numeric The tag serves a similar purpose but is any combination of numbers and letters and could be used if mice are tagged by other means such as toeclipping, transponders or tattooing. It does not need to be unique within the set of actual mice of the group.
If the tag is undefined for all selected mice this button shows the label "not set". If more mice are selected and no common tag can be determined it shows "multiple". You set this value by clicking this button or by clicking in the "tag" cell of a mouse table (if "Edit in in tables" is set in the Preferences) using this dialog:
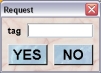
If more than one mouse is selected all mice will get the same tag because there is no precise consecutive order defined for alphanumeric values.
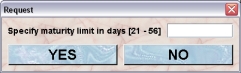
Maturity limit:
This button shows the defined maturity limit of the selected mice in days. You can set a default age when mice become sexually mature. Note: Placing a male and a female in the same cage will not make it a breeding cage unless both mice have reached sexual maturity. The default is six weeks or 42 days. It can be freely defined between 21 and 56 days (for details see: Matings). You will use this field only if all selected mice show an altered age of sexual maturity. The sexual maturity for a mouse is determined using this scheme:
- check the mouse. If a maturity limit ist specified for the mouse use it.
- check the line of the mouse If a maturity limit ist specified for the line use it.
- check the strains of the mouse If a maturity limit ist specified for one of the strains use it.
- use the default value of six weeks
If the maturity limit is undefined for all selected mice this button shows the label "not set". If more mice are selected and no common maturity limit can be determined it shows "multiple". You set this value by clicking this button or by clicking in the "Maturity limit" cell of a mouse table (if "Edit in in tables" is set in the Preferences) using this dialog:
License:
This button shows the legal license the selected mice are counted for. If the license is undefined for all selected mice this button shows the label "not set". If more mice are selected and no common license can be determined it shows "multiple". You set the license by clicking this button or by clicking in the "License" cell of a mouse table (if "Edit in in tables" is set in the Preferences) using this dialog:
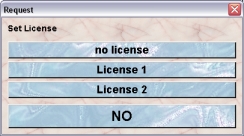
You have the choice between the actual license which are defined in your group. This choice will be presented as dropdown list or as buttons if less than 5 items are available.
This button shows the defined generation marker of the selected mice. In Mausoleum you can define a generation marker for mice. It wil displayed as "P" for the parental generation and "F1" for the childs, "F2" for te grandparents and so on.
Of course the generation is passed to the offspring of a mouse. The general rule is simple:
- pups of a "P" mouse have generation marker "F1"
- pups of a "Fn" mouse have generation marker "F(n + 1)"
But problems arise due to the fact the mice have two parents. These might be not the most dramatic problems due the same fact in other species, but anyway. Now we can run into trouble if the generation markers of the parents are not identical. We encounter these cases:
- both parents have the same generation marker: Fine. The rules from above apply.
- the father has a defined generation marker the mother hasn't or vice versa: Fine. Mausoleum uses the single generation marker and the rules from above apply.
- both parents have defined generation marker but they differ. Mausoleum now uses the "higher" marker ignoring the other and applies the rules from above. In this case you will see in the fact sheet of the pup an entry looking like this one which indiicates that the mother was "F2" father was "P" therefore the the mouse got the consecutive generation of the higher one "F3":

The automatically generated generation marker can be replaced by a manual override which can be set using this button.
If the generation marker is undefined for all selected mice this button shows the label "not set". If more mice are selected and no common generation marker can be determined it shows "multiple". You set this value by clicking this button or by clicking in the "Generation (P/F)" cell of a mouse table (if "Edit in in tables" is set in the Preferences) using this dialog:

If you select a generation marker for a mouse for which an automatically detemined generation marker was defined this will be regarded as manual override.
You can specify that the generation marker for the selected shall be deleted in a way that they won't bequeath the generation marker to their offspring any longer by selecting "Delete generation marker" in the selection field. As mentioned above you can manually override the generation marker inherited from the parents of the mouse. You can clear that manual override by selecting "Clear manual generation marker". If you do so the general rules again apply.
comments:
In this field you can type in comments to the respective mouse. Remember that you have to use the "Set"-button to transmit the changes in this field to the database. It is not possible to edit the comments if more than one mouse is selected. If you want to add a comment to more than one mouse use the "Add comment"-buttion in the "Actions" area of the inspector.
The "Results" tab
It shows the experimental results entered for the selected mouse:
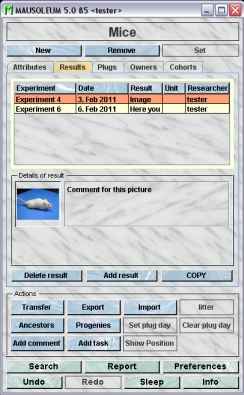
A detailed description about how to set experimental results and how they are presented in this tab can be found here.
The "Plugs" tab
It shows the plugdates of the selected mouse:
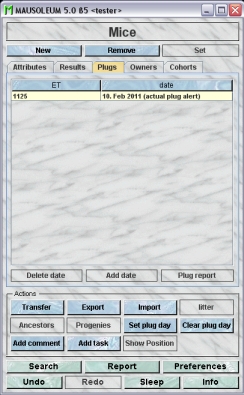
Plug dates give an overview of mice involved in timed matings. This tab behaves a little bit different between males and females. All Plug dates for selected female mice are shown in the list. The list can be edited both by adding and removing plugdates. Males do not get plug dates, but the performance of a male can be viewed by clicking Plug report. A new window opens showing all mating opportunities with dates for successful plugging.
The "Owners" tab
It shows the owners of the selected mice
�
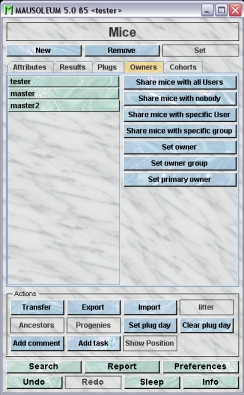
It is possible and in fact advisable to define one or more owners for a mouse. Ownership means that only these users can modify the attributes of the particular mouse. The exceptions of this rule are GURUs and CARETAKERs who can modify each object of the group. Only GURUs, MASTERs, EXTERNALs and STUDENTs can own mice. The default privileges for the different user roles regarding mouse ownership and general mouse handling are:
| GURU | MASTER | STUDENT | NOVICE | CARETAKER | EXTERNAL | |
| can be mouse owner | ✓ | ✓ | ✓ | ✓ | ||
| can see foreign mice | ✓ | ✓ | ✓ | ✓ | ✓ | |
| can handle foreign mice | ✓ | ✓ |
� |
|||
|
can create new mice |
✓ | ✓ | ✓ |
These default privileges can be modified or fine tuned for each user independently as described here.
Mice can also belong to an owner group. This is a group of users who can own groups and are treated like normal users in respect to mouse ownership. Whether or not a particular user owns a mouse is always determined on the fly. Mausoleum checks the three possibilities for a mouse ownership:
- The mouse has no defined owner. In this case all users of this group own this mouse (if this is possible for the given user)
- The user is one of the defined owners of this mouse
- The user is member of an owner group which is defined as an owner of this mouse
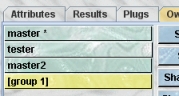
In the list on the left hand side of the "Owners" you see all the users who own the selected mice at the moment. Green tablets indicate that this user owns all the selected mice a yellow tablet indicates that this user owns only a subset of the selected mice. A little asterisk marks the primary owner of the selected mice in the example "master *". Owner groups which are defined owners of the selceted mice are shown in braces as in the shown exmpale "(group 1)".
If you own the selected mice or are the GURU of the group you can modiify the ownership of the selected mice by clicking one of the buittons on the right side of the "Owners"-tab. You have these options.
- Share mice with all users: This clears the ownership information of the selected mice and the mice belong to all users (GURU, MASTER or STUENT) of the group even if they are defined later on.
- Share mice with nobody: This defines you as being the only owner of the selected mice.
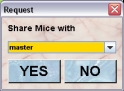
- Share mice with specific user: This will bring up a dialog in which you select the other user wiith whom you want to share selected mice. If the mouse belongs at the moment to all users you and the selected user will be the defined owners. If the selected mice already have defined users (including you) the selected user will be added to this list.
- Share mice with specific group: This action is very similar to the upper one except that in this case you select from a list of the defined owner groups. Mausoluem will not check if one of the defined is also member of the owner group.
- Set owner: This defines another user as being the only owner of the selected mice. You select the user from a list of possible users with the appropriate user roles.
- Set owner group: This defines a owner group as being the only owner of the selected mice. You will get a dialog where you select from a list of the defined active owner groups of the group.
- Set primary owner: The primary owner of the mouse is the one who is shown first on cage cards. The primary user can be chosen from the defined owners of the mice. Owner groups cannot be chosen as primary owner.
The "Cohorts" tab
It shows the cohorts to which at least one of the selected mice belong to.
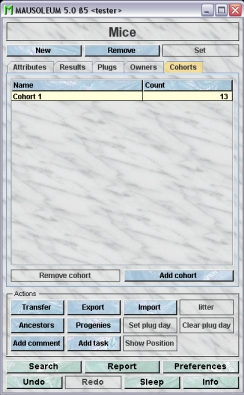
You can specify an additional cohort in which the selected mice should be included by clicking the "Add cohort"-button In the dialog the possible active cohorts are presented for selection. This choice will be presented as dropdown list or as buttons if less than 5 items are available.

Selecting the name of cohort will add the selected mice to the members of this cohort.
If you want to remove the selected mice from a specific cohort you select this cohort in the table and click the "Remove cohort"-button.
The actions
In the "Actions" area of the inspector you find several blue buttons which invoke various actions not directly connected to the attributes of the selected objects:
- Transfer: The selected mice can be transferred to a cage in the selction field. This functions the same way as drag and drop in the rack window. You get a dialog to specify the target cage and the date of the transfer. Please be careful with the transfer date. Functions like determination of the father or calculation of mating efficiency strongly depend on the correct dates of mosue transfers. If you select "new Cage" in the selection field a new cage is created and placed in the transfer area.
![]()
- Export: With this function you can export mice to other researchers. A detailed description of the export process can be found here.
- Import: If a user from another group has sent you mouse data via regular email you can import mice and their loci, lines and strains using this function. A detailed description can be found here.
- Litter: If a female mouse is selected you can porduce a litter from that mouse using this button. Details are described below.
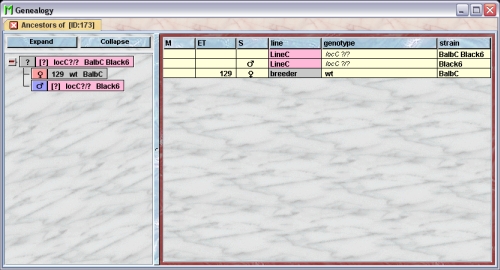
- Ancestors: This gives you a pedigree chart for each selected mouse as separate tabs in a new window. You can expand or collapse individual nodes by clicking the "+" or "-"-symbols in the tree veiw on the left side. The mouse table on the right side shows the visible mice of the tree view. You can expand or collapse the whiole tree by clicking the "Expand"- or "Collapse"-button. There is one special thing to mention about the tree view. If Mausoleum detects that a mouse has been already included in the tree it does not repeat this part of the tree. The respective tree node is marked as "Proxy" indicating that you find the "real" entry somewhere else in the tree together with all the ancestors of this mouse.
- Progenies:This gives you a tree view of all offspring from the selected mice as separate tabs in a new window. The user interface is the same as described for the Ancestors:

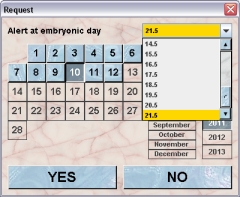
- Set plug day: This opens a calendar where the plugdate of a selected group of females can be indicated. It is possible to activate an alert on a number of days after observation of the plug:
- Clear plug date: Removes the plug date and inactivates the alert.
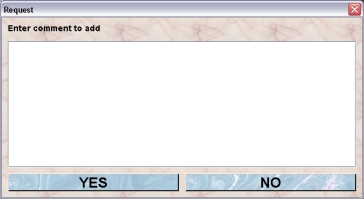
- Add comment: is used for adding the same comment to one or several selected mice. If only one mouse is selected the comment can be written directly into the comment field in the Mouse Inspector. You type in the comment to add in the text area of this dialog and click the "YES"-button:
- Add task: Adds the same task to the selected mice due on the date indicated in a dialog. In this dialog you specify the type of task to be performed. You can either select from the list of defined standard tasks or you select "Other" in this list and provide a description of the task to be done. It is possible to write much more than can fit into the small window. It is usually impractical to use this for long instructions though. Consider using the mail function combined with the Add task function. To see all tasks click the Tasks button in the object selection field of the inspector. You can select a favorite person to perfom the task. You can select from all those users who have the privileges to modify the attributes of all selected mice. You can set a time preference ("Morning", "Afternoon" etc.). In the calendar panel you specify the day when the task should be perfomed.
- Show position: Opens the Racks view and flashes the cage where the selected mouse can be found.
Creating new mice
There are several ways to add new mice to your database:
- Adding mice de novo without to other objects from the database. You will use thiis way if you receive mice from a distributor.
- Adding litters from a female mouse.
- Importing mice which were sent to you from another researcher. A detailed description can be found here.
Adding mice de novo
Select "Mice" in the object selection field of the inspector and click on the "New"-button. You will get this dialog:
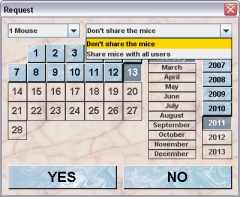
In the selection field in the upper left corner you define how many mice you are importing. There is a range of preselected numbers, but you also have the option to define any number. Also decide on whether these mice should be shared with all other users of the group or whether you should be the single owner these mice. A CARETAKER cannot own mice and therefore while importing mice will by default share the mice with all users, whereas all other users have the "don't share the mice" as a default.
The date you specify in the calendar panel in the lower part of the dialog is not the brithday of the mice. This can be set later on. It is the date where you imported the mice into your system. So this should be usually set to date when you physically imported the mice in your mouse room.
The new mice are shown in a table with the title "The recently created mice" with a time stamp as tab in a separate window:

In this mouse table you can now start defining the attributes of the new mice.
Creating a litter is very simple. You Select the female mouse having dropped a litter in any of the mouse table where it is listed and press the "litter"-button in the mouse inspector. In the dialog you have to specify number, ownership details and the date of birth:
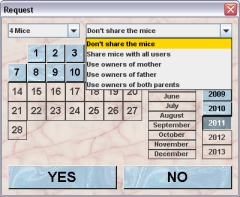
In the selection field in the upper left corner you define how many mice you are importing. There is a range of preselected numbers, but you also have the option to define any number. Also decide on whether these mice should be shared with all other users of the group or whether you should be the single owner these mice. In this dialog you can also specify to pass the ownership of mother or father or both to the pups. A CARETAKER can only select "Use owners from both parents":
![]()
After clicking "YES" the new mice are created using the information provided and shown in a table with the title "The recently created litter" with a time stamp as tab in a separate window:

These attributes are automatically set:
- The parents are set as attribute of all the offspring mice
- The pups are added to the list of kids for the mother and father
- The pups are placed in the same cage as the mother is located. If the mother is not put in a cage the litter cannot be produced and you will get this alert:

- The birthday is set to the date entered in the calendar field
- The strain of the pups is used from both parents if they are the same or is calculated as a mixture of the parents' strains
- If the line of both parents is the same this is set for the offspring. If they differ it depends on the type of lines involved. Is one of the breeder line the line from the other parent is used. Otherwise Mausoleum tries to find an active line which contains all loci and their alleles of the parents' lines. If no such line can be found a GURU can create a line mixture during the process of defining the litter. If the user hasn't got the approriate privileges to create a new line the line is left blank.
- If a line could be set for the offspring and automatic genotyping is enabled Mausoleum will set the genotype of offspring if its unequivocal. E. g. If both parents are +/+ for a given locus then the pup will also be +/+ for this locus. If the parents are +/+ and -/-for a given locus then the pup wil have the automatically generated genotype +/-. Automatic genotyping can be switched on or off generally in the Preferences or for each individual locus or line.
- If generation markers were set for at least one of the parents the corressponding generation marker is set for the pups as described here.
- If the parents are members of a cohort which is defined as inheritable each mouse of the offspring will become member of this cohort.
As you can see in the this listing it is very important for Mausoleum to know both parents in order to calculate certain attributes of the pups. But as known from other species determining the father can be a complicated task. The rules in Mausoleum are as follows:
|
1 |
Mausoleum first calculates the date of conception. The begin of the "crucial phase" is assumed to be 28 days before delivery and ends 16 days before delivery. Mausoleum checks for this period for male mice which were sexually mature shared the cage with the mother. If we find a unique candidate this one is chosen. |
|
2 |
To take into account that there might be a little error in the dates of the cage visits Mausoleum extends day by day for additional 6 days the begin of the "crucial phase". If there is a unique candidate this one is chosen. |
|
3 |
If there are more possible candidates let the user decide which one in a dialog with a table showing the possible candidates (see below rule 5). |
|
4 |
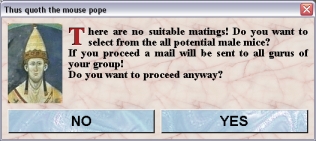
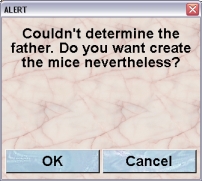
If we find no candidate the user is informed about this fact by a mouse pope alert:
If you proceed by clicking "YES" you can chose from mature actual cage mate(s) in a dialog with a table showing the possible candidates (see below rule 5). This rule was included because there could be an error in the date of the mouse transfer or the user imported a couple which was already in a mating in the group from which it was exported. |
|
5 |
If there is still no candidate the user can choose from all actual male mice which were mature at the date of calculated conception using this dialog:
In this dialog you first have to select one potential father and then you can confirm your selection by clicking "YES" |
|
6 |
If also there was no possible father (or the user didn't choose one) you will get this dialog:
If you click "YES" the litter is created without father |
Options 2, 3 and 4 are only possible with certain privileges which are available only for GURUs, MASTERs (3, 4, 5) or CARETAKERs (only 3)
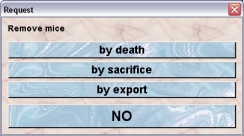
Removing mice
You will remove mice from the database if they either died or left your mouse colony by export. If you exported mice by exporting their data to another lab as described here, the mice are automatically marked as exported and removed from the set of the active mice and you do not need to remove them manually.
Select "Mice" in the object selection field of the inspector, select the mice you want to remove and click on the "Remove"-button. First you will get a dialog in which you specify the mode of removal:
Then you have to specify the date of removal using this calendar dialog:
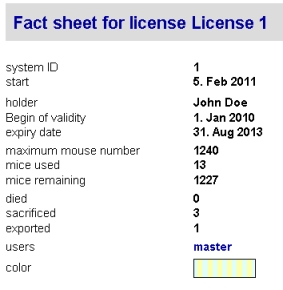
Clicking "Yes" will remove the mice from the set of the actual mice and the cage and will set the chosen end mode. You find the removed mice in the "Removed mice"-tab of the mouse window. If a license was defined for the removed mice they will be registered by their death mode as shown in this part of a fact sheet from a license where you can see the numbers of died, sacrificed and exported mice listed: