Mausoleum
Tasks
In brief
Tasks in Mausoleum give you the opportunity to schedule jobs to be done. This can be used either as a reminder if you plan a certain procedure to be performed on a later date or you can plan your daily work in the mouse room right at your desktop. It also enables you to issue a task to be carried out by someone else. This can be either everyone who owns the specific mouse or a designated favorite whose skills you trust most. Using the Mausoleum task feature you can follow up whether and if so when and by whom this task was performed or whether it is already in progress.
A task in Mausoleum has one of these status:
- Pending: The task is issued but no action has taken place so far
- In Progress: Someone is currently performing the task but it is time consuming and cannot be done in a single step
- Done: The task is finished
- Rejected: The task cannot be performed. The reason for it should be given in the comment field
- Withdrawn: The issuer can withdraw a task.
- Deleted: The task is deleted and not visibible any more.
The life cycle of a task is shown in this picture:
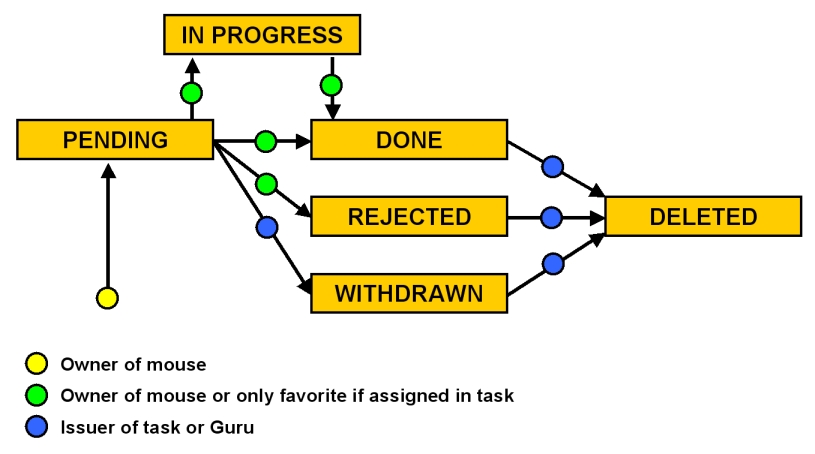
Life-cycle of Mausoleum tasks
As you can see every owner of a mouse can issue a new task. This is done by selecting a mouse and clicking the “Add task“ button in the mouse inspector.
A mouse with a task assigned to it has a red triangle in the first column of any mouse table.
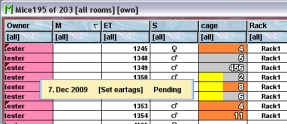
If you move the mouse pointer over the respective line in the mouse table a little tooltip appears which shows the details of the tasks assigned to that mouse. You see the date, the type and the status of the task.
The Task window
The task window will open automatically during log in if there are some alerts detected from the system or by clicking "Tasks" in the object selection field of the Inspector. The user will get a window with the table of all actually defined tasks and the other alerts for mice the user has sufficient privieleges to handle:
This window has up to five tabs from which the first two will show up only if there are alerts pending.
The "Weaning" tab
This tab will only appear if there are cages where pups should be separated from their parents. This check is done during startup of the program. If there are such cages this window willl automatically be shown after initalization.
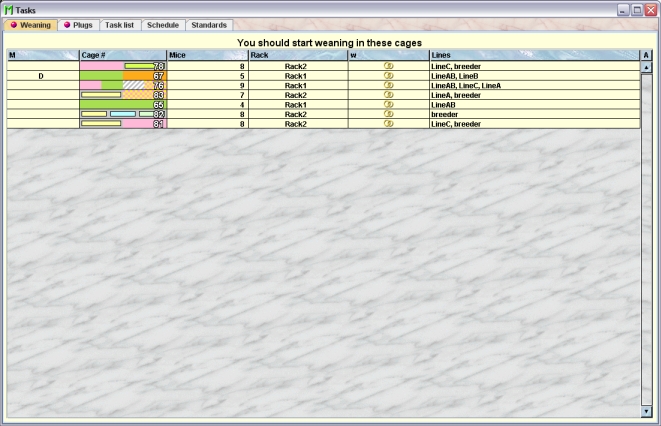
This tab holds a table where you find all the cages in which you should start weaning. They will disappear from this list as soon as the pups are spearated from their parents
The "Plugs" tab
This tab will only appear if there mice where a plug alert has been set and the date at which the user wanted to be notified is today or in rthe past. This check is done during startup of the program. If there are such mice this window willl automatically be shown after initalization.
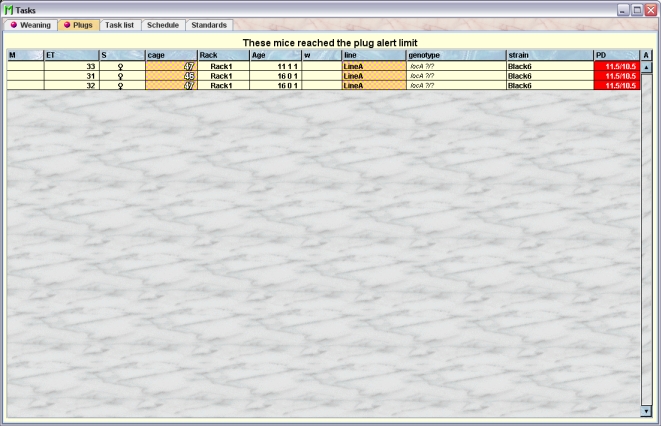
This tab contains a table where you can see all mice for which an plug alert has been set. Plug alerts can be set when a plug is registered for the mouse. While registering you can specify the embryonic day at which you want to be notified. If the plug alert is cleared the mice will disppaear from this list.
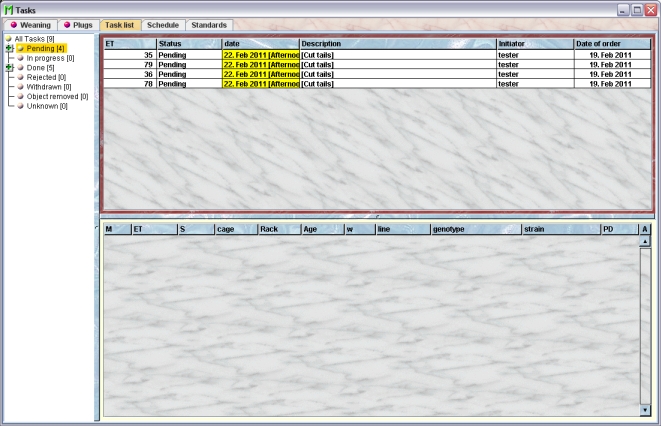
The "Task list" tab
This tab shows all task which have been set for the mice for which the user has sufficient privileges to handle.
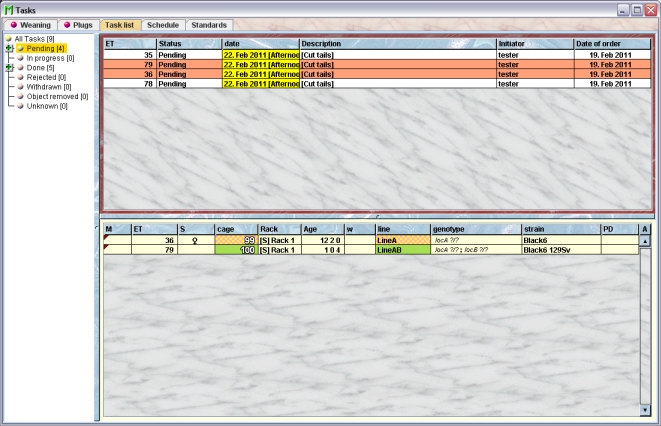
On the left you see a tree view where all the tasks are grouped according to their status. There are two additional nodes which hold the task of unknown status (should actually never happen) and under "Object removed" the tasks for which the mouse has been removed from the set of active mice but the task wasn't finished yet. These tasks are listed here for the issuer of the task. Each node containing tasks has a plus or minus sign and can be "opened" to reveal all the tasks of this status.
If the user selects a status node the tasks with the respective status are shown in the task table in the upper right area of this window. Using the command "Arrange columns" from the context menu (right mouse click in the table) you can specify which attributes of the tasks should be shown in this table. These attributes are available for the task table:
| Column header | Description | Sortable | Filterable | Colorable |
| Date of order | Shows the date, when this task was initiated | ✓ | ||
| Description | Description of the task | ✓ | ✓ | |
| ET | Eartag of the mouse | ✓ | ||
| Favorite | Shows the favorite user to perform this task | ✓ | ✓ | ✓ |
| Finished at | Shows the date when the task was finished | ✓ | ||
| Finished by | Shows the name of the user who finished the task | ✓ | ✓ | ✓ |
| Foreign key | Foreign ID from other system | ✓ | ||
| Group | Group name | ✓ | ✓ | |
| ID | The technical ID | ✓ | ||
| Initiator | Shows the name of the user who initiated this task | ✓ | ✓ | ✓ |
| Rack | ✓ | ✓ | ✓ | |
| Status | Shows the status of this task | ✓ | ✓ | |
| Task ID | The ID of the task | ✓ | ||
| cage | ✓ | ✓ | ✓ | |
| comment | The comment | ✓ | ||
| date | Date for the task | ✓ | ✓ | |
| end | The end date of the object | ✓ | ||
| start | The start date of the object | ✓ |
Below the task table you find a mouse table which shows the mice for which one of the selected tasks has been set.
The Task inspector
The task inspector is active as soon as the task table becomes the active table. It will adopt to the attributes of the selected task and lets the user modify the attributes if the user has sufficient privileges to do so. The task inspector has five tabs
The "Mice" tab
In this tab you see a table with the mice for which the selected task has been set.
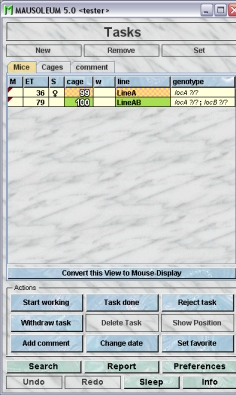
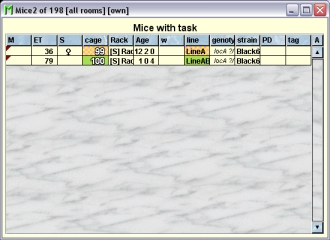
Because this table is within the inspector it cannot be used to modify the attributes of the displayed mice. To generated a mouse table which can be used to alter the attributes of the mice you click the button "Convert this view to Mouse display" and a window with a table containing the mice will open:
The "Cages" tab
In this tab you see a table with the cages which contain mice for which the selected task has been set.
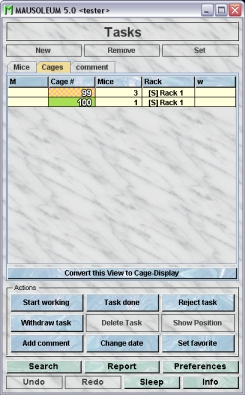
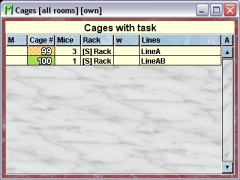
Because this table is within the inspector it cannot be used to modify the attributes of the displayed cages. To generated a cage table which can be used to alter the attributes of the cages you click the button "Convert this view to Cage display" and a window with a table containg the cages will open:
The "comment" tab
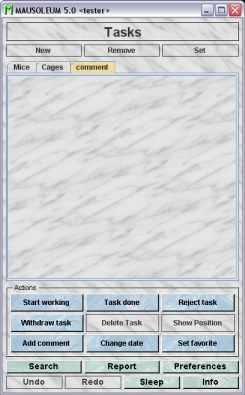
In this tab you can the comments entered for the selected task. Comments are entered when the status of the task changes.
The actions
In the "Actions" area of the inspector you find several blue buttons which invoke various actions for modifying the selected tasks:
- Start working: Sets the status of the selected tasks to "In progress" indicating that someone is currently performing the task but it is time consuming and cannot be done in a single step. A comment which will be added can be specified with this dialog:
- Task done: Reports the selected tasks as done and changes the status accordingly. A comment which will be added can be specified with this dialog:
- Reject task: This will used if the task cannot be performed. The reason for it should be given in the comment this dialog:
- Withdraw task: The status of the selected task can be set to "withdrawn" by the issuer of the GURU of the group. This indictaes that for whatever reason there is nothing to do about it. The reason for teh withdrawal should be given in the comment this dialog:
- Delete task: Tasks which have been finished, rejected or withdraen can be deleted from the list. They are also removed automatically after six weeks after have been set to a terminal status.
- Show position: Opens the Racks view and flashes the cage where mouse of the selected task can be found.
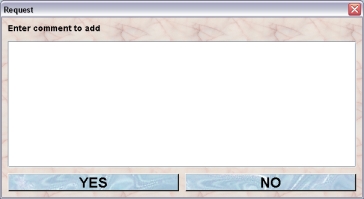
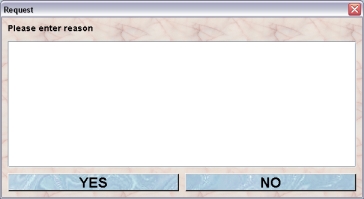
- Add comment: This action used for adding the same comment to one or several selected tasks.You type in the comment to add in the text area of this dialog and click the "YES"-button:
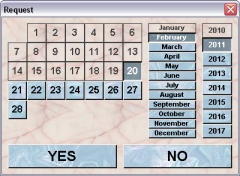
- Change date: The issuer of the task and the GURU of the group can change the due date of the selected tasks.The new date is specified with the calendar dialog and you are asked to enter a reason for changing the date.
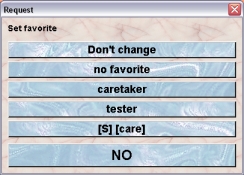
- Set favorite: You can specify that a task should be carried out by specific use whose skills you trust most. You can change this setting with this action. After clicking this button you specify the wanted favorite with the following dialog. In this dialog you can also clear the setting for the favorite user bz selecting "no favorite" If you are using Mausoleum in an environment with shared racks and rooms and therefore the service group is used also the caretakers of the service group can be set as favorite. In the choice these users are marked with an "[S]" as being members of the service group. This choice is presented as a set of buttons as shown below or as selection field if more than five options are present.
Adding tasks
Every owner of a mouse can issue a new task. This is done by selecting a mouse and clicking the “Add task“ button in the mouse inspector:
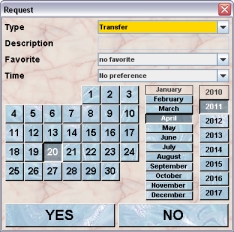
In the next dialog you can specify the type of action and you can as an option select a favorite user, who should perform the task. You also have to specifz the date when the task should be performed A time preference (moring, noon etc.) can be set as an option.
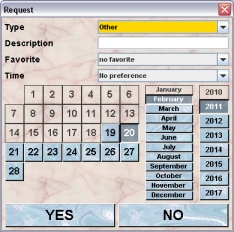
Type: Here you specify the type of the task. This can be either one of the standard procedures or any other job which then has to be specified. The standard procedures include e. g.:
- Set eartags
- Kill
- Cut tails
- Transfer to new cage
The nice thing about the standard tasks is that if possible the task will be automatically marked as done as soon as the respective operation is performed in the database. For example if the type of the task is “Set eartags” and you specify the eartag of the respective mouse you do not need to take care of the task. It is automatically marked as done. This does not apply for standard task like “Cut tails” which do not change the data of the mouse in the database,
The GURU of a group can extend the lst of standard tasks. This is useful if you have lab specific procedures. How to create new standard tasks is described below.Description: If you have selected “Other” in the Type-selection you have to specify the type of the task manually. You will type in the desctiption in this field. Of course these tasks cannot be marked as done by the program and the user who has done the the job will have to tell the program when the task was finished. If you have selected any other type the "Description"-field is disabled as shown here:
Favorite: If you want that the task should be performed by a specific person you can select here the user. In thsi selection field all possible users are presented. If you are using Mausoleum in an environment with shared racks and rooms and therefore the service group is used also the caretakers of the service group can be set as favorite. In the choice these users are marked with an "[S]" as being members of the service group.
The "Schedule" tab
In the schedules tab you see on top a graphical representation of the scheduled tasks.
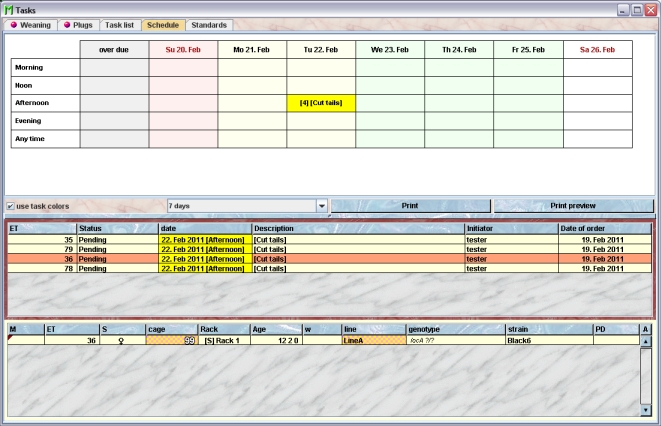
The task scheduled for the next days are shown as separate blocks according to the specifeid date and time preference. Tasks which are already over due are shown in the first column.
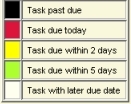
You can decide whether or not you want to use the task colors in this schedule. by selecting the checkbox "use task colors". White indicates a task in the future, green the task date is in 5 days, yellow in 2 days, red today and black shows that the tasks are past due.
How many days should be shown is specified with the selection field right to the color checkbox.
In the lower part of this tab you find two tables the upper one shows the tasks you have selected in the schedule. The lower table shows the mice of the tasks which are selected in the task table directly above this table.
The issuer of a task or the GURU of a group can change the due date of a task. This can be done using the "Change date"-button in the inspector or more easily here in the schedule. You simply drag and drop the particular task to the new due date. After the drag and drop you should enter a reason for changing the tasks' date:
The "Standards" tab
In Mausoleum you have a bunch of predefined standard tasks. But there might also be the need for procedures which are specfic for your group. In this tab you see a table which contains the active standard tasks. These are the predefined system standard tasks as well as your lab specific standard tasks:
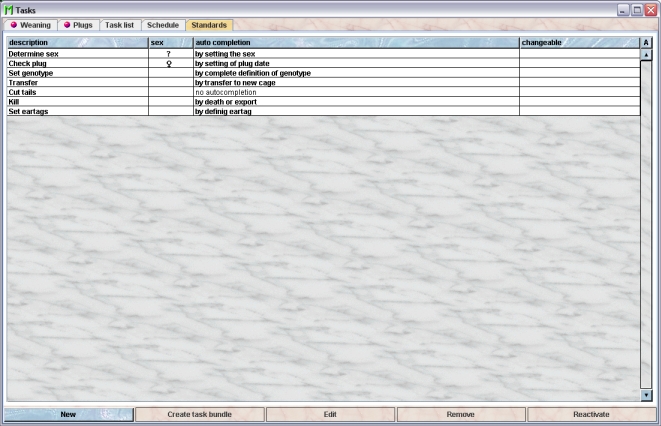
Using the command "Arrange columns" from the context menu (right mouse click in the table) you can specify which attributes of the standard tasks should be shown in this table. These attributes are available for the standard task table:
| Column header | Description | Sortable | Filterable | Colorable |
| auto completion | Shows the action by which the standard task is automatically finished | ✓ | ✓ | |
| bundle | Shows whether or not the standard task is a task bundle | ✓ | ✓ | |
| changeable | Shows whether or not the standard task is changeable | ✓ | ✓ | |
| description | The description of the standard task | ✓ | ||
| primary tasks | Shows the rpimary standard task of the bundle | ✓ | ||
| sex | Shows for which sex the standard task is possible | ✓ | ✓ |
In the standrad table a GURU can specify whether only the active standard tasks should be displayed in the table or also the inactivated standard tasks. To switch between these display modes you use the little "A" button in the top right corner of the table:

If this button is active (pressed) the GURU will see all objects of the group. The active objects are shown in bold whereas inactive objects are shown with in italics.
Creating a new Standard task
You create a new group specific standard task by first selecting "Tasks" in the object selection field of the inspector, selecting the "Standards"-tab ind the task window and clicking on the "New"-button in the lower left corner of the "Standards"-tab (not in the inspector!). You specifiy attributes of the new standard task with this dialog:
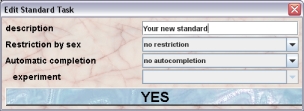
These attributes can be specified:
- description: The name of the tasktype. This should be a really short description which the people in your group easily recognize.
- Restriction by sex: You can specify whether this task can be set only for male, female or mice without defined sex. This flag will restrict the set of possible tasks if you want to add tasks for the selected mice in a mouse table.
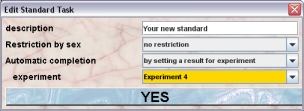
- Automatic completion: Here you can specify which action will automatically marks the task as finished. You have these options
- no autocompletion: This indicates that no automatic completion of the task can take place and the user has to mark the task as finished manually
- by defining eartag: The task is marked as done when the mice receives an eartag
- by death or export: When the mouse is killed, sacrificed or exported the task is marked as done. The task will in this case be visible only for the issuer of the task.
- by transfer to a new cage: Any transfer to a new cage will mark this task as finished.
- by complete definition of genotype: If the genotype is completely defined the task will be regarded as finished. Partial definition of the genotype which is possible in Mausoleum is not sufficient.
- by setting of plug date: The task is finished if a new plug date is set for the mouse
- by setting the sex: Assigning the sex to a mouse will finish tasks of this type
- by transfer to a mating: Only a transfer to a mating cage will mark this task as finished
- by setting a result for experiment: The task is finished if a particular experiment has been performed and the result was set for the mouse. If you select this option you also have to specify the particular experiment you expect results for. If this option is chosen the selection field "experiment" is activated and lets you choose from the list of active experiments of the group:
Clicking "YES" will create the new standard task which is then available for all users of the group who have sufficient privileges to add a task.
If you are using Mausoleum with the service group also the CARETAKERs of the service group can add tasks. They are also able to add group specific standard tasks to the mice. But of coursethey can only add standard tasks of a particular group if all the selected mice belong to this group.
Creating a new task bundle
Tasks bundles are a set of individual tasks which are bundled together. In such a task bundle you can define that the tasks should be carried out subsequently with a defined time struvcture. E. g. you might want to define a series of tasks in which on day 1 you perform a special treatment on day 3 in the evening you should check the mice and on day 6 you have to sacrifice the mice.
Mausoleum gives you the opportunity to define such task bundles which are created from the simple standard tasks. First you select the standard tasks you want to use in the task bundle (at least two).
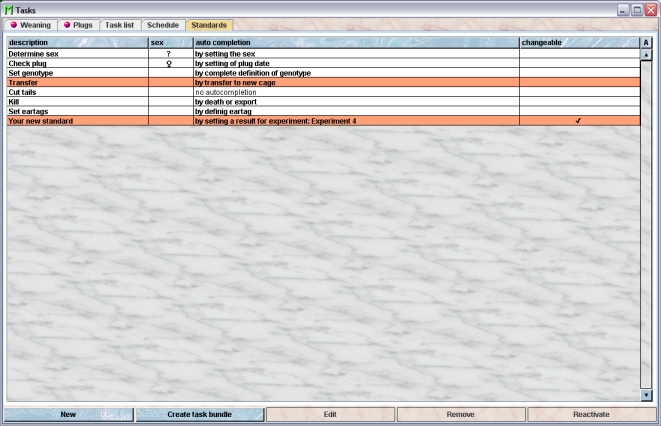
Then you define the name or definition of the task bundle and for each of the individual subtasks the day offset and time preference and confirm the creation of the new task bundle by cliocking "YES" in this dialog:

If the user now adds this task bundle to a mouse using the "Add task"-button in the mouse inspector and specifies a date then for each element of the task bundle a task will automnatically be added. In the shown expample this would happen:
- at the specifed date the task "Transfer" wil be added
- 4 days after the specified date another task "Your new standard" will be added.
Removing standard tasks
Only GURUS can remove the group specific standard tasks. The predefined system standard tasks cannot be removed. Removing a standard task will not remove it from the database. It merely becomes invisible to the users and cannot be selected for a task anymore.
To remove a particular standard task select it in the standard task table and click the "Remove"-button.
Reviving standard tasks
The GURU of Group can inactivated group specific standard tasks. To do so first you have to make the standard task visible in the standard task table. You can do it using the "A" button in the upper right corner of the table.
Then you have to select the particular standard task and click ont "Reactivate"-button in the lower right corner of this tab.