Mausoleum
Preferences
You invoke the preferences dialog by clicking the "Preferences" button in the lower right area of the Mausoleum inspector:

After clicking this button the preferences dialog shows up. This dialog has several tabs which let you specify the different parameters for Mausoleum usage.
General
In this tab general parameters of the Mausoleum user interface are determined
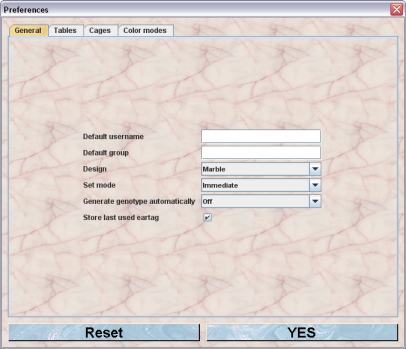
- Default user name sets the User upon log in from the particular PC.
- Default group set group upon log in from the particular PC.
- Design is the background decoration for Mausoleum.
- Set mode is the mode of action when you change an attribute of an object. If set to "immediate" the change is (for most of the attributes) immediately written to the database. In the other case the changes are collected and only transmitted to the databse, when the "Set"-button is pressed. Exceptions from this rule are the comment-fields. Here you change the text. Because there is no clear "End of action sign" as for other fields you have to tell Mausoleum when you are done with editing. Therefore the field turns red upon changing and the text is set, when you click the "Set"-button.
- Generate genotype automatically can be set to on or off and in the on position Mausoleum will deem offspring to homozygous parents as homozygous. In the off position the user has to confirm genotype.
- Store last used eartag: If set the last eartag which was set by the user will be stored on the server and in the nect session of this user the next number will be used as a default if the user sets an eartag.
Tables
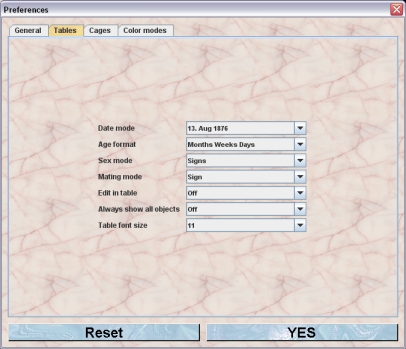
- Date mode gives you the choice between different modes (european and american) how Dates will be presented in Mausoleum tables
- Age format comes in three flavours: Weeks, Months/weeks/days or Weeks/days. When copying tables containing the two latter modes Excel tends to misinterpret the data after pasting into a worksheet.
- Sex mode is either signs or letters in the tables.
- Mating mode is either signs or letters in the tables.
- Edit in table can be set on or off which may restrict editing to the inspector and drag and drop procedures.
- Always show all objects determines whether you will see other's objects (mice or cages) in all tables.
- Table font size Her you specify the font size which should be used in all the tables
Cages
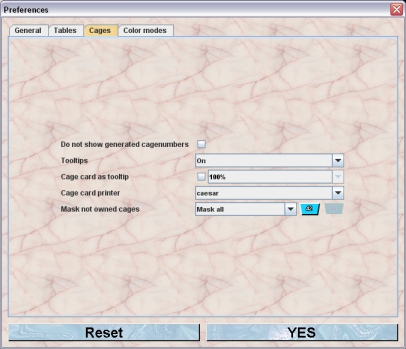
- Do not show generated cagenumbers Mausoleum will generate cage numbers automatically. The main reason for this is that most users prefer to have small cage numbers instead of numbers which will grow as long as you use the Mausoleum. But if you like to use the system-ID of the cage instead you have to check this box.
- Tool tips determines whether or not tooltip/mouse over windows appear when you move the mouse over a cage in the rack window or any cage table.
- Cage card as tooltip will show the cage contents formatted as the selected cage card printer above when checked. If the checkbox is selected you can specify in addition the zoom factor by which the cage card is enlarged or shrinked.
- Cage card printer is the default cage card design suggested when printing cage cards.
- Mask not owned cages will hide or characterize cages belonging to other users visually depending on which mode is active.The options are Mask nothing, Mask Border, Mask Border and number or Mask all.
Color modes
Mausoleum comes with a lot of different color modes for indicating certain aspects of the content of cages. Usually you won't use all of them. In this tab you can specify which color modes will be used and which one is the active color mode.

You see two lists in which the color modes are displayed. The left one comntains the color modes which aren't used at the moment. Thes modes will not be selectable in the selection box of the rack window or the rack overview. The right list contains the color modes which you want to use. By moving the cursor over the list items you get a tooltip (here shown for color mode "Weaning") showing you information about the color scheme used in the particular color mode. You also see the little red spot indicating the active color mode. You can define a different active color mode by simply clicking in the area in front of the name of the desired color mode.
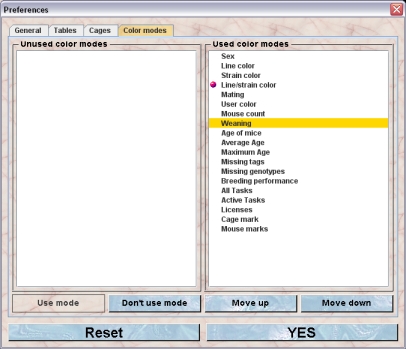
After selecting a color mode you can disable or enable it using the buttons "Use mode" or "Don't use mode" respectively. The buttons "Move up" and "Move down" let you determine the order in which the color modes are displayed in the selection boxes in the rack window or the rack overview.