Mausoleum
Lines
In brief
Lines represent the transgenic lines of your mice. They contain the definition which alleles you can expect for a defined subset of your loci. Thus at least one locus need to have been defined before a line can be created. Only GURUs can add and edit lines. Creating a new line starts with giving a name choosing a colour and assigning one or several loci to the line. When you create the line you can choose if some of the alleles defined for the locus do not appear in the line and if these can be excluded. Allels can later also be added but not taken away.
There is one special line which is generated when a group is created. This the "breeder" group. This line is chosen for the wild-type animals which are used for matings with your transgenic animals. In this line neither loci nor alleles are defined. Therefore the only possible genotype for animlas of this line is wild-type ("wt").
Assigning a line to mouse determines which genotypes are possible for the particular mouse. The order by which the loci appear can be changed according to your wish. The order of the alleles in a genotype, i. e. will it be displayed as +/- or -/+ is governed by the order of the alleles in the respective locus.
Creating a mixtiure of lines which occurs by breeding animals from different lines is possible. The program will collect the necessary loci and alleles and you do not need to define them by hand. You can also produce a report of the result from breeding defined genotypes together. Eg. A large number of offspring from breeding heterozygous animals without any being homozygous could indicate a genotype causing embryonic lethality.
The Line table
By clicking "Lines" in the object selection field of the Inspector you will get a window with the table of all actually defined lines of the group.
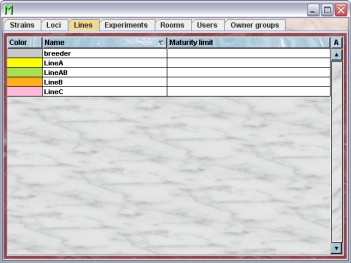
Using the command "Arrange columns" from the context menu (right mouse click in the table) you can specify which attributes of the line should be shown in this table. These attributes are available for the locus table:
| Column header | Description | Sortable | Filterable | Colorable |
| Color | The color used for this line | ✓ | ||
| Eartag prefix | MTM_TT_PREFIX | ✓ | ✓ | |
| Foreign key | Foreign ID from other system | ✓ | ||
| Group | Group name | ✓ | ✓ | |
| ID | The technical ID | ✓ | ||
| Maturity limit | The maturity limit. I. e. the time in days for the mouse to become sexually active. Default value is 42 (6 weeks) | ✓ | ✓ | |
| Name | The name of the line | ✓ | ||
| end | The end date of the object | ✓ | ||
| start | The start date of the object | ✓ | ||
| tag | Alphanumeric Tag | ✓ | ✓ |
In the line table a GURU can specify whether only the active lines should be displayed in the table or also the inactivated lines. To switch between these display modes you use the little "A" button in top right corner of the table:

If this button is active (pressed) the GURU will see all objects of the group. The active objects are shown in bold whereas inactive objects are shown with in italics.
The Line inspector
The line inspector is active as soon as the line table becomes the active table. It will adopt to the attributes of the selected line and lets the user modify the attributes if the user has sufficient privileges to do so. Only GURUs can add and edit lines. The locus inspector has four tabs
The "Attributes" tab
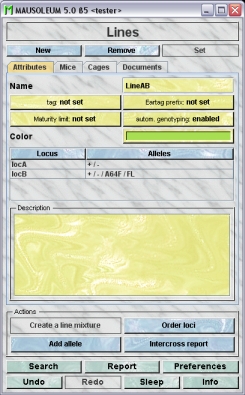
It shows the attributes of the locus:
- Name: The name of the line. It can be changed by the GURU
- Tag: An alphanumeric tag which can be used to mark or group lines. It can be set or changed by the GURU
- Eartag prefix: Depending on the kind of tagging the mice the numbers for the eartag can be limited. In this case it can be useful to use the eartag prefix of a line. This prefix will be set in front of the eartag of the mice. This makes it possible to reuse one eartag number multiple times if the mice belong to different lines. The GURU can enter here any alphanumeric value. But it is recommended to use short prefixes.
- Maturity limit: You can set a default age when mice of the particular line become sexually mature. Note: Placing a male and a female in the same cage will not make it a breeding cage unless both mice have reached sexual maturity. The default is six weeks or 42 days. It can be freely defined between 21 and 56 days (for details see: Matings). You will use this field only if all mice of a given line show an altered age of sexual maturity.The value will be entered using this dialog:

- automatic genotyipng: Here you can manually override the setting for automatic genotyping for each line individually. If automatic genotyping is enabled Mausoleum will set the genotype of offspring if its unequivocal. E. g. If both parents are +/+ for a given locus then the pup will also be +/+ for this locus. If the parents are +/+ and -/-for a given locus then the pup wil have the automatically generated genotype +/-. If automatic genotyping is disabled the user has to enter the genotype also in these cases.
- Color: The GURU can assign a color to a strain. It is very convenient to assign colours such that lines can be discerned or grouped. You can use plain colors or color patterns. A description of the Color choose dialog can be fond here.
- A list of the loci and their alleles which are present in the selected line is shown. The order by which the loci appear in a genotype from a mouse of the selected line is determined by the order of the loci as shown in this list and can be changed according to your wish. The order of the alleles in a genotype, i. e. will it be displayed as +/- or -/+ is governed by the order of the alleles in the respective locus.
- Description: In this field you can type in comments to the respective cage. Remember that you have to use the "Set"-button to transmit the changes in this field to the database. It is not possible to edit the comments if more than one object is selected.
The "Mice" tab
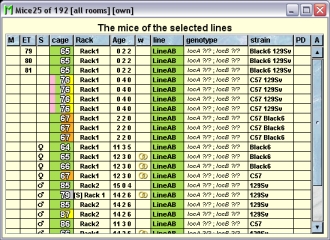
In this tab you see a table with the mice which have one of the selected lines.

Because this table is within the inspector it cannot be used to modify the attributes of the displayed mice. To generated a mouse table which can be used to alter the attributes of the mice you click the button "Convert this view to Mouse display" and a window with a table containing the mice will open:
The "Cages" tab
In this tab you see a table with the cages which contain mice which have one of the selected lines.
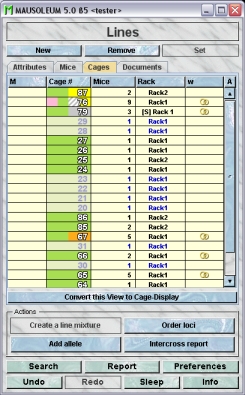
Because this table is within the inspector it cannot be used to modify the attributes of the displayed cages. To generated a cage table which can be used to alter the attributes of the cages you click the button "Convert this view to Cage display" and a window with a table containg the cages will open:

The "Documents" tab
This tab lets you store and exchange documents like pdf- or Word-files with additional informations about the lines of your group. In this tab you will find a list with the document which have been uploaded to the server.
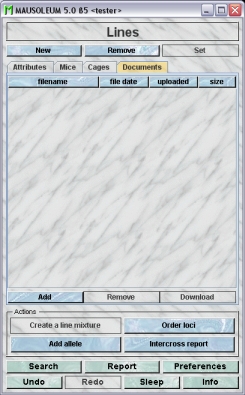
GURUs can add new documents for the selected objects by clicking the "Add"-button beneath the documents list. You will be asked for the location of the document and after congfiming this dialog the file is uploaded top the server and will be displayed in the list. GURUs can also remove documents by selecting one of the documents in the list and clicking the "Remove"-button beneath the documents list. You can download a document and store it on your client computer by clicking the "Download"-button.
The actions
- Create a line mixture: The GURU can create a line mixture. This is the standard procedure when creating a new line from breeding two lines together. It is simpler than defining a new line from scratch. By selecting two lines in the list you get the option to create a line mixture. This is more convenient than creating a new line with all involved loci. The GURU of a group can create mixture lines. First you have to select the lines for which you want to create the mixture line. After clicking this button you will get a dialog which shows the generate line information. You might want to change the name which is set to the combined names or the color which was set to the mixed color of the two lines. You can also edit the locus and allele-composition of the line which can be done by clicking the buttons to the left of the locus and alleles table in the dialog:
- Order loci: When several loci are defined for a line it may also be a good idea to order them such that the important information is most accessible in tables and on cage cards. In the inspector you see the list of the loci and their alleles which are present in the selected line is shown. The order by which the loci appear in a genotype from a mouse of the selected line is determined by the order of the loci as shown in this list and can be changed according to your wish. The order of the alleles in a genotype, i. e. will it be displayed as +/- or -/+ is governed by the order of the alleles in the respective locus. Clicking this button will bring up a dialog in which you can modify the locus order by selecting a locus and then clicking either "Move up" or "Move down"

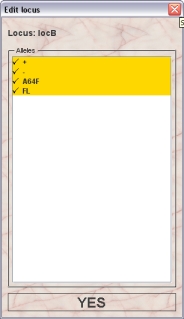
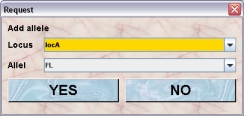
- Add allele: If you have added alleles to a locus after the line was created you have the option of adding them individuially to the line. This is convenient if you for example have several variant construct over the same locus. You create the wt and ko alleles to start with. After creating the different lines you add alleles to your locus such as loxP or FRT flanked parts and alleles created by the presence of a recombinase. This way you can exclude alleles that will not appear in a substrain. It is not possible to remove alleles from a line. After clicking this button ou will get this dialog. In the upper selection field you select the locus, which is included in the selected line. In the lower selection field you can select from the alleles of the selected locus which are not already available in this line
- Intercross report:You can produce a report of the result from breeding defined genotypes together. Eg. A large number of offspring from breeding heterozygous animals without any being homozygous could indicate a genotype causing embryonic lethality. After clicking this button you get a dialog allwoing you to specify the line and genotyes for the father and mother, You can also allow breeder animals as parents or allow that on of the parents is unknown.
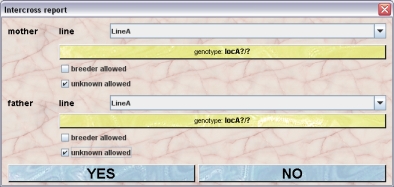
By clicking "YES" in this dialog will start the intercross report generation. Mausoleum will then check the mice whether their parents match the conditions and group the mice witgh matching parents by line and genotype. In the result window you see after a while a table where the the overall results are shown.

Clicking in one of the lines shows the collected offspring in the mouse table beneath the result table. If the number of mice in this table differs from the one shown in the result table please check the "A" in the upper right corner of the mouse table which controls the visibility of mice by ownership.
Adding lines
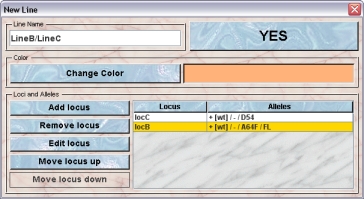
Only GURUs can addnew lines. To add a (transgenic) line you click "Lines" in the object selection field of the Inspector. In the line inspector you click the "New"-button.A dialog opens where you can specify the data for the new line:
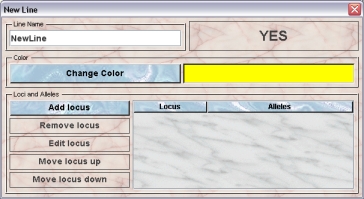
Give the Line a name and a colour. You can use plain colors or color patterns. A description of the Color choose dialog can be fond here. It is very convenient to assign colours such that lines can be discerned or grouped. Name and color of the line can be changed afterwards.
Add one or several loci to the transgenic line by clicking the "Add locus"-button. You will get a dialog allowing you to specify the locus and the alleles which will be present in the new line:
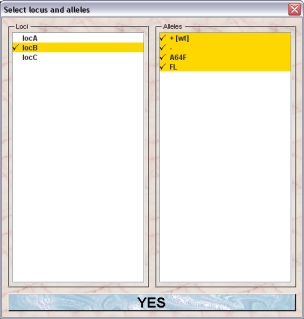
When you select a locus in the left list the defined alleles of this locus are shown in the right table. You can select or deselect the alleles by clicking on the names. The alleles which will be present in the line are shown with a checkmark in front of the name. Clicking "Yes" will add the selected locus with the selected alleles to your new line.
It is possible at this stage to remove a locus. Therefore select the locus you want to remove in the table and click "Remove locus". After the line is defined and stored in the database it is not possible to add or remove loci.
The order by which the loci appear in a genotype from a mouse of the selected line is determined by the order of the loci as shown in this list and can be changed according to your wish. You can change the order of the loci by selecting a locus in the table and click either "Move locus up" or "Move locus down". The order of the loci can be changed afterwards.
If you detect that you didn't specify the alleles of a particular locus properly when you added the locus before you can edit the locus. This means you can change the alleles which are used in the new line for that locus. To do so select the locus in the table and click the "Edit locus"-button.In the dialog you can select or deselect the alleles to be included in the new line by clicking on their names. The alleles which will be present in the line are shown with a checkmark in front of the name. Clicking "Yes" will set the highlighted alleles to be used for th selected locus in your new line.